Office Payments
Modified on Thu, 23 Oct at 1:52 AM
Guide Overview
Office Payments can be processed directly from the Office Cash Account or from the Matter.
TABLE OF CONTENTS
Processing Office Payments
Office payments can be accessed from several menus of the system:
- Home menu > Create new (plus) button > Office Payment
- Home menu > Banking Menu > Office Account > New Entry > Payment
- Dashboards > Accountant Dashboard > Office Account > New Entry > Payment


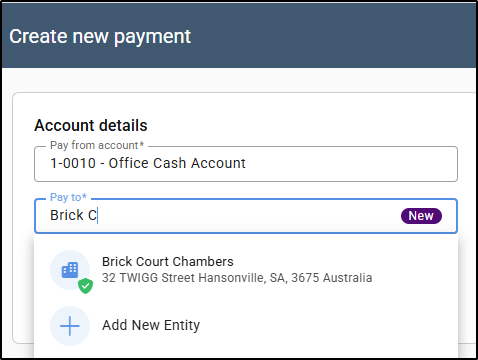
1. On the payment screen the Pay From Account field will pre-populate when processed directly from the Office Account. Otherwise, select the relevant Office Cash Account.

2. Start typing a name in the Pay To field to select an entity from the directory. If the entity does not exist, a purple New symbol will appear to the right of the field.

3. Once entered, any Purchases or Anticipated Disbursements available to pay for the chosen creditor, will populate in the Payment Allocations area of the screen.
4. If a default Payment Method has been set up, payment method and banking information will pre-populate. Where this has not been set up for the selected supplier, select a payment method from the drop-down menu for which the monies will be paid, once a selection has been made, an additional Payment Method screen will appear, enter the relevant details and select Save in the bottom right of the screen.

5. To access the payment details, at any point, select the i to the left of the payment method field and enter the banking information.

6. If relevant, amend the Posting Date. The posting date is the date in which the payment is being recorded to the ledger.

7. Enter a Reason for the payment.

8. To attach a document such as an Invoice, Click Attach Files in the top right of the screen. Alternatively, Drag and Drop the file from a location on your desktop, into the box provided.

9. Remove any allocations you do not wish to pay by ticking the box to the left of the allocation line. Then selecting the Remove Selected button from the pop up box in the middle of the screen.

10. Should you need to add any additional lines, select the Add allocation button in the top right of the screen.

11. In the Allocate To column, begin typing in the relevant matter number, entity name or invoice number.

12. Once selected, the Allocation Type and Description will pre-populate.

13. Enter the Amount, Tax Code and Billing Tax Rate.

14. If the payment is Tax Exclusive, ensure to turn off the Tax Inclusive toggle in the top right of the screen.

15. The Total of the allocations will show in the bottom right of the screen.

16. Once everything has been entered, select Post or Post and New in the bottom right of the screen.

Recording an Office Payment from a Matter
An office payment may be made from a matter for refunding matter credit funds. When posting a payment from the matter, the allocation is assumed to be Matter Credit Funds.
1. Navigate to the relevant Matter.
2. Select Office Ledger from the Matter Actions menu on the right hand side.

3. Select Post Payment from the drop-down menu.

4. On the payment screen select the relevant Office Account.
5. Start typing a name in the Pay To field to select an entity from the directory. If the entity does not exist, a purple New symbol will appear to the right of the field and a note under the field will inform the user that an entity card will be created.
6. Once entered, any Purchases or Anticipated Disbursements available to pay for the chosen creditor, will populate in the Payment Allocations area of the screen.
7. If a default Payment Method has been set up, payment method and banking information will pre-populate. Where this has not been set up for the selected supplier, select a payment method from the drop-down menu for which the monies will be paid, once a selection has been made, an additional Payment Method screen will appear, enter the relevant details and select Save in the bottom right of the screen.
8. To access the payment details, at any point, select the i to the left of the payment method field and enter the banking information.
9. If relevant, amend the Posting Date. The posting date is the date in which the payment is being recorded to the ledger.
10. Enter a Reason for the payment.
11. To attach a document such as an Invoice, Click Attach Files in the top right of the screen. Alternatively, Drag and Drop the file from a location on your desktop, into the box provided.

12. Remove any allocations you do not wish to pay by ticking the box to the left of the allocation line. Then selecting the Remove Selected button from the pop up box in the middle of the screen.
13. Should you need to add any additional lines, select the Add allocation button in the top right of the screen.
14. In the Allocate To column, begin typing in the relevant matter number, entity name or invoice number.
15. Once selected, the Allocation Type and Description will pre-populate.
16. Enter the Amount, Tax Code and Billing Tax Rate.
17. If the payment is Tax Exclusive, ensure to turn off the Tax Inclusive toggle in the top right of the screen.
18. The Total of the allocations will show in the bottom right of the screen.
20. Once everything has been entered, select Post or Post and New in the bottom right of the screen.
Filing Office Payments
1. To set up the system to automatically file an office payment, click on Settings and then Firm Settings. Then select Notification Preferences. Note this can only be accessed by your firm administrator.
2. Click on Matters , then click on Notification Preferences.

3. Click on the arrow to the left of Matters to expand. Navigate to Office Payment Posted, place a tick in File then select Save

Was this article helpful?
That’s Great!
Thank you for your feedback
Sorry! We couldn't be helpful
Thank you for your feedback
Feedback sent
We appreciate your effort and will try to fix the article