Cost Centres
Modified on Thu, 23 Oct, 2025 at 1:45 AM
Overview
Revenue and expenses can be allocated across divisions and cost centres. While many smaller firms may not use divisions and will only have a default division in their system, larger firms will typically use divisions in order to allocate revenue and expenses across their various branch offices.
The function of cost centres is to allow for a secondary layer of transaction allocation. As such, it is possible to allocate transactions first to a division (eg. branch or office) and also to a cost centre (eg. department, team or Marketing campaign).
Where cost centres are set up, it is then possible for a Profit and Loss statement to be filtered and generated in order to show the split across the various branches and / or departments.
Cost centres are set up as customisable ad hoc tags which can then be applied to transactions. This guide will cover how to create cost centre tags, how to apply them to transactions and how to generate a profit and loss statement which is split by cost centre.
TABLE OF CONTENTS
Creating a new Tag
In order to create a new cost centre ad hoc tag:
1. Click on Settings from the Navigation Menu, then click on Firm Settings.

2. Select Accounting then select Ad Hoc Cost Centres

Note: You must have the requisite permissions in order to create / amend cost centres.
3. Click Add New Tag located in the top right corner of the screen.

4. Type a tag name and add a description. Note that each tag name must be unique. If you attempt to create a new tag that already exists, you will be prompted with a warning advising that “Tag must be unique”.

5. Click on Save.

Amending or Deactivating a tag
In order to amend or deactivate an existing cost centre tag:
1. Click on Settings from the Navigation Menu, then click on Firm Settings.
2. Select Accounting then select Ad Hoc Cost Centres
Note: You must have the requisite permissions in order to create / amend cost centres.
3. Navigate to the relevant cost centre tag and click on the ellipsis button located on the right-hand side of the tag and then click on Edit or Deactivate in the dropdown menu. If amending a tag, proceed to make the required changes and then click on Save. If deactivating a tag, proceed to click on the Deactivate this tag button in order to confirm the deactivation.

Applying cost centre tags to transactions
Once created, cost centre ad hoc tags can be applied in order to allocate income and expenditure when processing transactions. As such, the option to apply a tag appears in multiple locations / screens across the system including the Office payments and Receipts screens, Purchases screen and the Post Transaction (general journal posting) screen. In this example, we have shown the payments and receipts screen as accessed via the Accountants Dashboard.
Note: When receipting or making payments, it is possible to apply multiple tags to the same transaction. For example, it is possible to allocate a division, team and ad hoc cost centre to a transaction.
Office Payments
1. From the Accountant Dashboard (or Banking menu), click on the relevant office cash account and then click on New Payment from the Account Actions menu.


2. Complete the payment details as normal.
3. On the allocation grid, click into the 'Tags' column and begin typing the name of the tag(s) which you wish to apply against the transaction. Noting that the tags column will only be available where the 'Allocate To' field is an Account. Click on the tag name as it appears to apply it.
Once all required tags have been added, repeat this step for any additional allocation lines and then click on Post in order to post the transaction.

Office Receipts
1. From the Accountant Dashboard (or Banking menu), click on the relevant office cash account and then click on New Receipt from the Account Actions menu


2. Complete the receipt details as you normally would.
3. On the allocation grid, click into the 'Tags' column and begin typing the name of the tag(s) which you wish to apply against the transaction. Noting that the tags column will only be available where the 'Allocate To' field is an Account. Click on the tag name as it appears to apply it.
Once all required tags have been added, repeat this step for any additional allocation lines and then click on Post in order to post the transaction.

Purchases
1. From the navigation menu, click on Purchases and then click on the Add Purchase button.
2. On the allocation grid, click into the 'Tags' column and begin typing the name of the tag(s) which you wish to apply against the transaction. Noting that the tags column will only be available where the 'Allocate To' field is an Account. Click on the tag name as it appears to apply it.
Once all required tags have been added, repeat this step for any additional allocation lines and then click on Post in order to post the transaction.

Post Transaction (Office Journal)
1. From the navigation menu, click on General Ledger and then click on the Office journal in which you wish to post a transaction.

2. Click on the Post Transaction button from within the Journal Actions menu on the right-hand side of the screen.

3. Complete the transaction details as you normally would. Click on the add button on the top-right hand side of the screen in order to add the required number of journal entry lines.

4. On the allocation grid, click into the 'Tags' column and begin typing the name of the tag(s) which you wish to apply against the transaction. Noting that the tags column will only be available where the 'Allocate To' field is an Account. Click on the tag name as it appears to apply it.
Once all required tags have been added, repeat this step for any additional allocation lines and then click on Post in order to post the transaction.
Profit & Loss statement: How to segregate by cost centre
If desired, it is possible to segment your profit and loss statement by cost centre. For example, you may wish to have your Profit & Loss statement segmented first by Division, and then by Cost Centre.
In order to achieve this:
1. From the navigation menu, first click on Reports and then click on Profit & Loss.

2. Click on the 'Segment by' filter located at the top of the screen and select the 'tag' option.
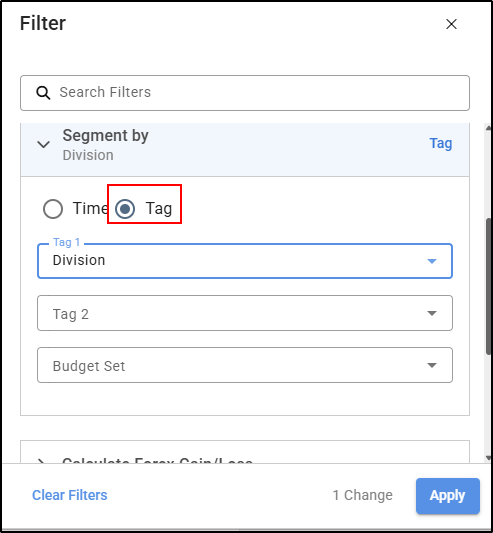
3. Confirm the tags with which you wish to segment the report by making selections in the 'Tag 1', 'Tag 2' and 'Budget Set' dropdown menus as appropriate and then click on Apply. In the example below, we wish to segment first by Division and then by Cost Centre (Ad Hoc tag) and therefore the tags have been applied in this order.

Note: As Cost Centres are created as 'Ad Hoc' tags, this is the name of the corresponding segmentation option within the dropdown menu in the 'Segment by' filter.
Was this article helpful?
That’s Great!
Thank you for your feedback
Sorry! We couldn't be helpful
Thank you for your feedback
Feedback sent
We appreciate your effort and will try to fix the article