Receipt Requests
Modified on Thu, 23 Oct, 2025 at 1:53 AM
TABLE OF CONTENTS
Overview
Receipt Requests can be used for recording expected funds to be received. There are three types of Receipt Requests that can be created - Matter, Invoice and Account.
A Matter Receipt Request is used to notify the accounts team that monies have been received into the client/trust account for a Matter and require posting to the system.
An Invoice Receipt Request is used to notify the accounts team that monies have been received in relation to an outstanding invoice and requires posting to the system.
An Account Receipt Request is used to notify the accounts team that monies have been received and requires posting directly to an Account in the Office Journal.
Receipt Request: Matter
The Matter Receipt Request can be created as follows:
1. Navigate to the relevant Matter.
2. Select the + next to Requisitions on the Matter Actions menu on the right hand side.

3. Select Receipt request from the options.

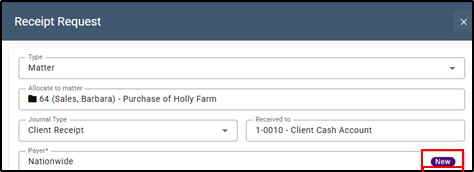
4. Select the Type as Matter from the drop-down menu.

5. The Matter will automatically be allocated.

6. The Journal Type will default to Client/Trust Receipt.

7. The Received to field will default to the Client/Trust Cash Account, if there are multiple cash client cash accounts available start by clicking into the field a list will appear to select from.

8. Start typing a name in the Payer field to select an entity from the directory. If the supplier does not exist, a purple New symbol will appear to the right of the field and a note under the field will inform the user that an entity card will be created.
Note: When adding a new supplier during the processing of a transaction, additional address and payment details will need to be entered on the entity card and the newly created Supplier will be taken through a Supplier Verification process. This process allows Supplier banking information to be reviewed prior to any Payment being made to the supplier.
9. Select the Receipt Method from the drop down.
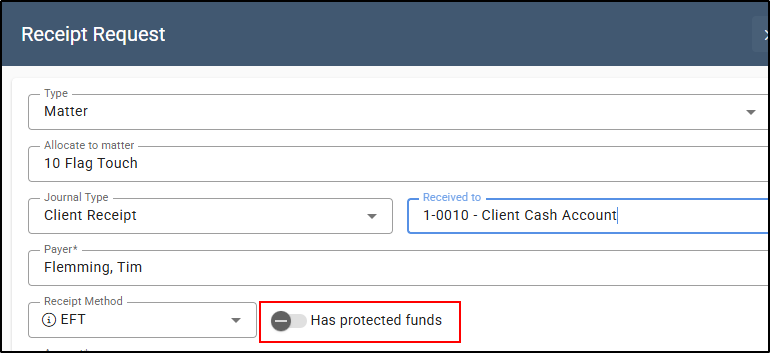
10. If the Receipt includes funds that should be protected for a specific purpose, click the Has protected funds toggle to the right.

11. Once selected it will change to blue and a Protected Funds Details screen will open. Enter the details and amount to be protected.
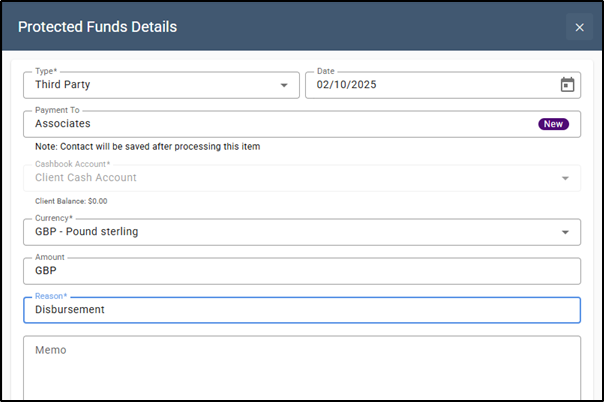
12. Once save has been selected on the Protected Funds Detail screen - it will bring you back to the main receipt request screen. Type in the Amount that has been received.

13. Type or select from the calendar symbol to the right of the Posting Date, the date on which the money was received.

14. Type in a reason in the Reason field or you can type in a shortcut from the Receipt Reason. if unsure, click on the Text Template icon on right of the Reason field to update from available shortcut templates.
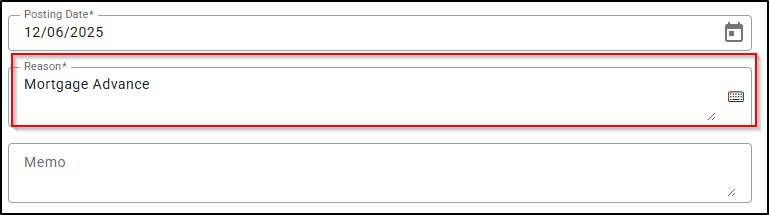
15. Type any notes in the Memo field provided. Noting this is an optional field and are therefore not compulsory to saving the request.
16. Select Save.

Receipt Request: Invoice
The Invoice Receipt Request can be created as follows:
1. Navigate to the relevant Matter.
2. Click on the + to the right of Requisitions option on the Matter Actions menu on the right hand side.

3. Select Receipt Request from the options.

4. Select the Type as Invoice from the drop-down menu.

5. Type the Invoice number into the Invoice field.

6. Start typing a name in the Payer field to select an entity from the directory. If the supplier does not exist, a purple New symbol will appear to the right of the field and a note under the field will inform the user that an entity card will be created.

Note: When adding a new entity whilst processing a transaction, the subsequent entity is created with an Active status.In order to complete the details such as address, contact information and bank details the newly created Entity must be Updated in Directory.
7. Select your bank account from the drop-down menu in the Received to field.

8. Select the Receipt Method from the drop down .

9. The Amount will prepopulate with the invoice total from the invoice number entered above that has been received.

10. Type or select from the calendar symbol to the right of the Posting Date, the date on which the money was received.

11. The Reason field will prepopulate with the invoice details, but can be amended.

12. Type any notes in the Memo field provided. Noting this is an optional field and are therefore not compulsory to saving the request.
13. Select Save.

Receipt Request: Account
The Account Receipt Request can be created as follows:
1. In the navigation menu along the top of the screen, click on the create new + button.

2. Select the Receipt Request from the menu.

3. Select the Type as Account from the drop-down menu.

4. Start typing a name in the Received From field to select an entity from the directory. If the supplier does not exist, a purple New symbol will appear to the right of the field and a note under the field will inform the user that an entity card will be created.
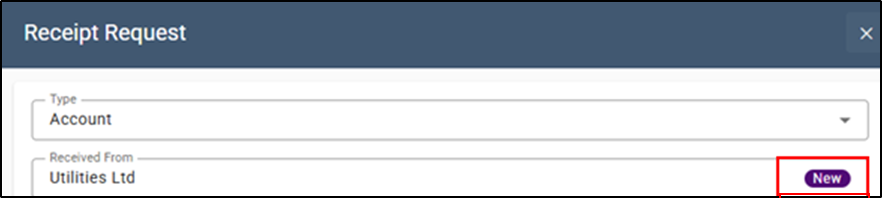
Note: When adding a new supplier during the processing of a transaction, the subsequent entity and supplier are both created with an Active status.In order to complete the details such as address, contact information and bank details the newly created Entity card in Suppliers must be Updated in Directory. The newly created Supplier will need to undergo a Verification process .This process allows Supplier banking,Tax and payment terms information to be reviewed prior to any Payment being made to the supplier.
5. The Journal field will pre-populate with the journal name. If there are multiple journals set up click into the Journal field and pick the required Journal from the list.

6. Click into the Received to and select from the list of accounts.

7. Type the account number or name into the Allocate to field and the required account from the list.

8. Select the Receipt Method from the drop down.

9. Enter the Amount that has been received.

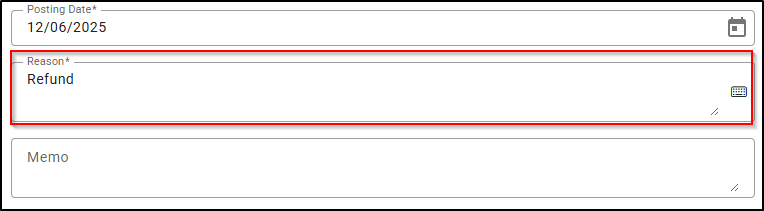
10. Type or select from the calendar symbol to the right of the Posting Date, the date on which the money was received.

11. Enter a reason for the funds in the Reason field. Select Text template icon on right of the Reason field to update from available shortcut templates.
12. Type any notes in the Memo field provided. Noting this is an optional field and are therefore not compulsory to saving the request.
13. Select Save.

Was this article helpful?
That’s Great!
Thank you for your feedback
Sorry! We couldn't be helpful
Thank you for your feedback
Feedback sent
We appreciate your effort and will try to fix the article