Creating a Requisition
Modified on Thu, 23 Oct, 2025 at 1:53 AM
Guide Overview
Requisitions can be used throughout the system to request payments or purchases for Office or matter-related expenses. There are various types of requisitions which can be selected:
- Purchase > New Disbursement is used to add a received supplier's invoice to a matter (creating a billable creditor to the client). This invoice will be paid at a later stage.
- Purchase > Anticipated Disbursement is used to allocate an anticipated disbursement already present in the system to a purchase. An anticipated disbursement is one that is not yet incurred but can still be invoiced to the client.
- Payment: > Office Expenses is a request for a payment to be made directly from the Office bank account, and it is not matter-related.
- Payment > New Disbursement is a request for a payment to be made directly from the Office bank account, however it is matter-related. The payment, once issued, will be invoiced to the client as an incurred disbursement.
- Payment > Anticipated Disbursement is used to request that a payment be made to the supplier of an anticipated disbursement which has already been entered.
- Payment > Trust is used to request for a payment of Trust funds to be made to a client or third party.
- Payment > CMA or Investment is used to request for a payment to be made to a third party directly from a matter's CMA or Investment Account.
- Payment > General Ledger Disbursement is similar to an incurred disbursement (Payment > New Disbursement), except rather than creating a cashbook entry, the credit side of the transaction will be posted to a General Ledger (GL) account of your choice.
TABLE OF CONTENTS
Creating a new Requisition
To create a new Requisition from the top menu:
1. Navigate to the Create New menu (+ button) in the top menu, then select Requisition. 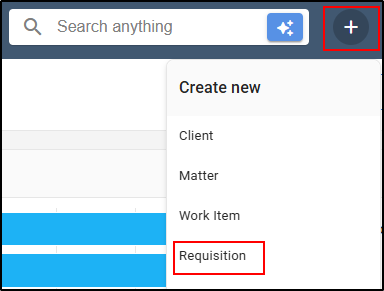
2. The Payment Request window will appear. Select the relevant Purchase or Payment Request and complete the details.

Create a new Requisition from a Matter
1. Navigate to the relevant matter.
2. Select Requisition from the menu on the right of the matter.

3. Select any Request type and complete the details.

Requisition Types
Purchase: New Disbursement
The Purchase > New Disbursement requisition can be created as follows:
1. Select the Type as Purchase > New Disbursement from the drop-down menu.

2. If the requisition was created from the matter, the matter number will populate automatically. If the Requisition was created from the Create New menu, the matter number will need to be entered manually.
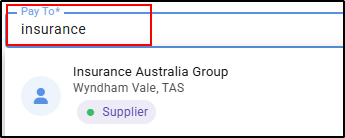
3. Start typing the payee's name in the Pay To field to select an entity from the directory.
4. If the supplier does not exist, a purple New symbol will appear to the right of the field and a + Add New link will appear, allowing for the creation of the new supplier. Note Contact willl be saved after processing this item

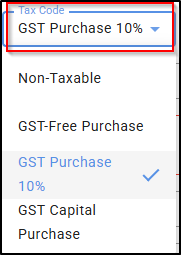
5. Type in the Amount Tax code, excluding Tax.

6.Select the Tax code.
7. Start typing a name in the Approver field to select an employee from the directory.
8. Type in a reason in the Reason field, for the entry.
9. Type or select from the calendar symbol to the right of the Required on line, the date on which the purchase is required.

10. Enter the invoice number, if you have already received an invoice from the supplier.

11. Type any notes in the Memo field and relevant comments in the Supplier Comments field provided.
These are optional fields and are therefore not compulsory to saving the requisition.

12. Click Attach in the bottom right of the screen.

13. Update Drag and drop the relevant file from a location on your desktop into the box provided, or click on the Drop files here to upload in order to import the file.
14. Select Upload in the bottom right of the screen.

Note: Once a transaction is completed with an attachment present, you can later access the attached file by navigating to the relevant Office or Client/Trust ledger, selecting the transaction and then selecting the Attachment's heading.
15. Select Save in the bottom right of the screen.

Note: When adding a new supplier during the processing of a transaction, the subsequent entity and supplier are both created with an Active status. In order to complete the details such as address, contact information and bank details the newly created Entity card in Suppliers must be Updated in Directory. The newly created Supplier will need to undergo a Verification process .This process allows Supplier banking, Tax and payment terms information to be reviewed prior to any Payment being made to the supplier.
Update Entity Details Directory- Suppliers
Go To Directory- Suppliers search newly created contact
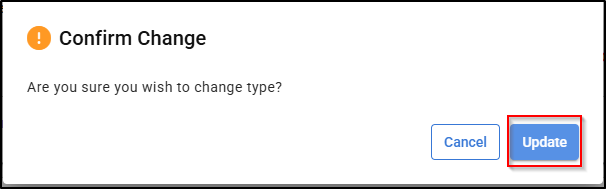
1(a) In Contact , select whether the supplier is an Individual or Organisation and confirm Change.
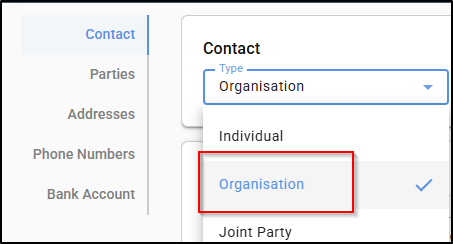
Confirm Change.
1(b) Complete the Contact Details - tick box is available to use Organisation name as preferred name

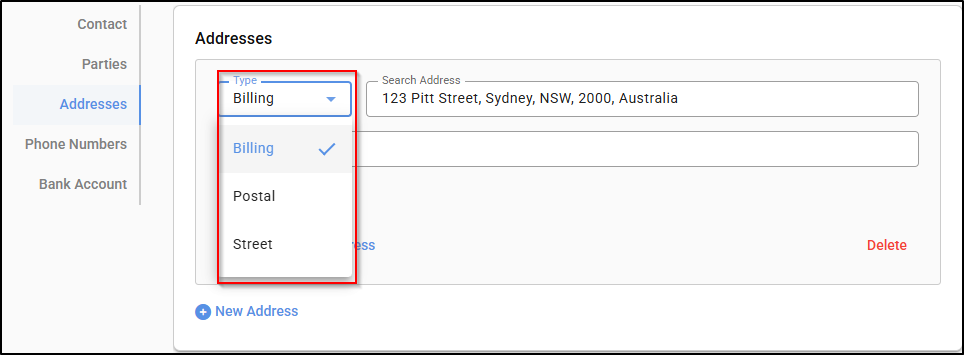
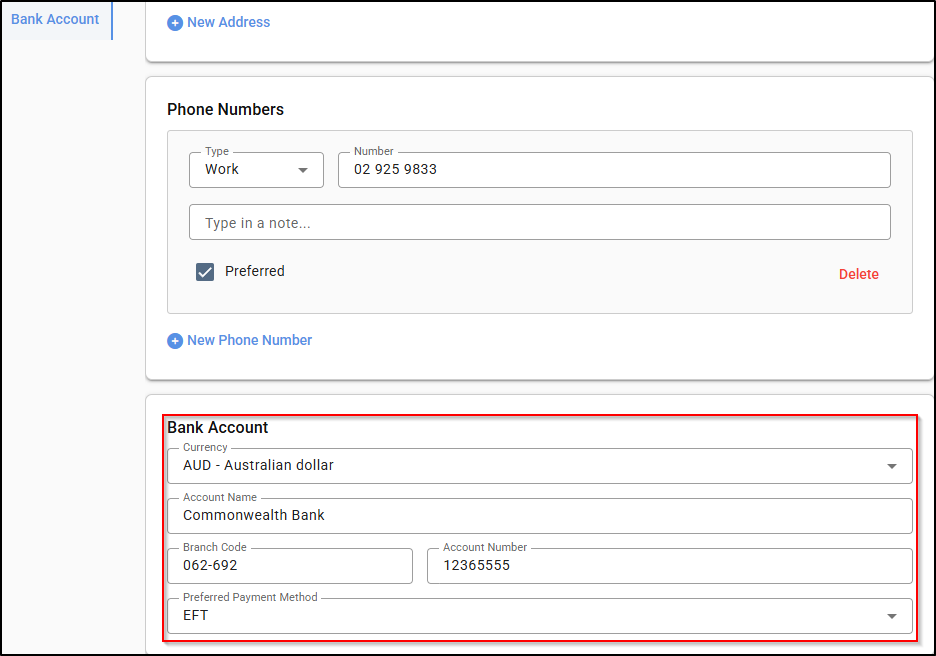
1(c) Complete the Addresses (selecting the Type).
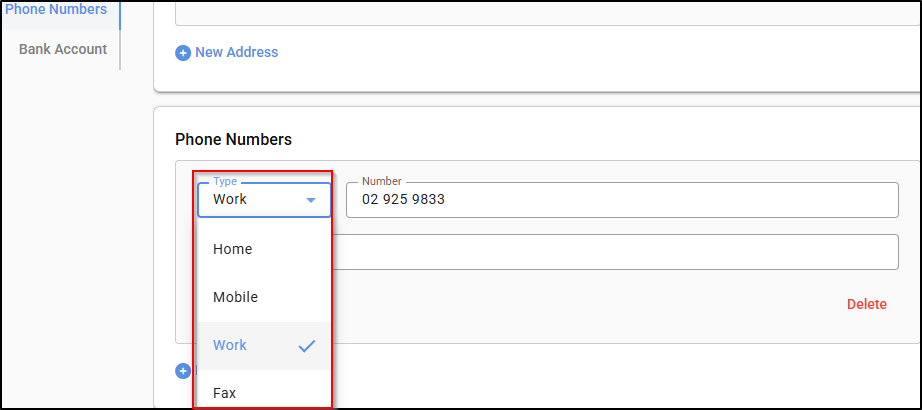
1(d) Phone Numbers (selecting the Type)
1(e) Bank Account Details, then click on Save or Save as Draft.
Update Supplier Card
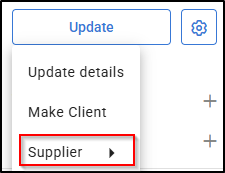
Review newly-created Supplier Card confirm Default Tax Code and Payment terms. Save or Save as Draft.
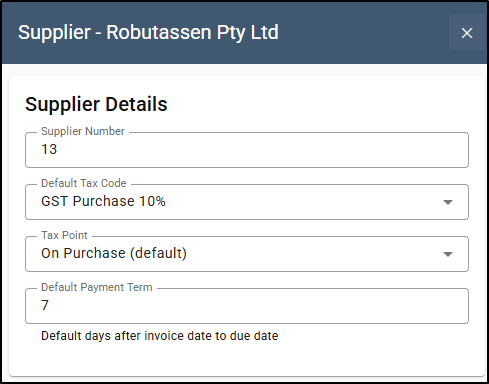
Once all the Details have been updated on Entity Card and Supplier Card reviewed. The Entity can now be Verified
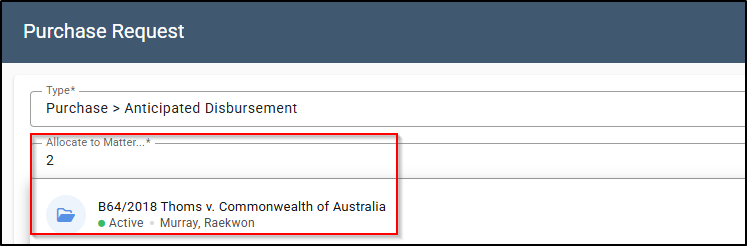
Purchase: Anticipated Disbursement
A Purchase > Anticipated Disbursement can be created as follows:
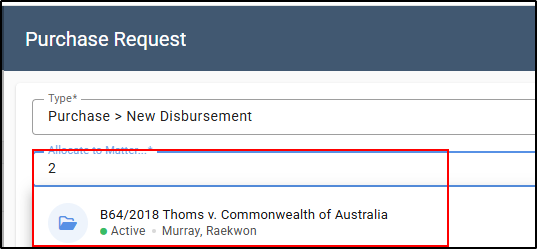
1. Select the Type as Purchase > Anticipated Disbursement from the drop-down menu.

2. In Allocate to Matter, type in the matter number, matter description or client name to locate and select the matter.
3. Search for the anticipated disbursement which needs to be allocated to a purchase by starting to type either the supplier's name, matter number, matter name or disbursement description into the Allocate to anticipated disbursement field.

4. The Pay to, Amount (inc tax) and Journal fields will automatically populate with the details of the Anticipated Disbursement, based on the above selection.

5. If the supplier does not exist, perform steps under the Purchase: New Disbursement heading.
6. Start typing a name in the Approver field to select an employee from the directory.

7. Enter a reason for the request in the Reason field.

8. Type or select from the calendar symbol (to the right of the Required on line) the date on which the Anticipated Disbursement is required.

9. Type any notes in the Memo field and relevant comments in the Supplier Comments field provided.
These are optional fields and are therefore not compulsory to saving the requisition.

10. Click Attach in the bottom right of the screen.
11. Drag and drop the relevant file from a location on your desktop into the box provided, or click on the Drop files here to upload in order to import the file.
12. Select Upload in the bottom right of the screen.
Note: Once a transaction is completed with an attachment present, you can later access the attached file by navigating to the relevant Office or Client/Trust ledger, selecting the transaction and then selecting the Attachments heading.
13. Select Save in the bottom right of the screen.

Payment: New Disbursement
The Payment > New Disbursement requisition can be created as follows:
1. Select the Type as Payment > New Disbursement from the drop-down menu.

2. The Allocate to matter field will automatically populate with the matter you are preparing the requisition in.
3. Start typing a name in the Pay To field to select an entity from the directory. If the supplier does not exist, perform steps 3(a)-3(e) under the Purchase: New Disbursement heading.

4. Should the selected supplier have a preferred method of payment chosen on set up, the Payment Method field will automatically populate with this selection and the relevant banking details, for example EFT.

If no payment method has populated for the selected supplier, the Payment Method will need to be selected from the dropdown menu.

5. The (i) to the left of the Payment Method field allows you to view the Payment Method details screen and enter the details relevant to the transaction, should you wish to do so at this stage. The Payment Method details (i) are not mandatory to save the requisition.

6.Type in the Amount Tax code, excluding Tax.
7. Select the Tax code.
8. Start typing a name in the Approver field to select an employee from the directory.

9. Enter a reason for the request in the Reason field.

10. Type or select from the calendar symbol to the right of the Required on line, the date on which the payment is required.

11. Type any notes in the Memo field provided, if required. This is an optional field and therefore not compulsory to saving the requisition.

12. Click Attach in the bottom right of the screen.
13. Drag and drop the relevant file from a location on your desktop into the box provided, or click on the Drop files here to upload in order to import the file.
14. Select Upload in the bottom right of the screen.
Note: Once a transaction is completed with an attachment present, you can later access the attached file by navigating to the relevant Office or Client/Trust ledger, selecting the transaction and then selecting the Attachments heading.
15. Start typing a name in the Approver field to select an employee from the directory
16. To complete the requisition, select Save in the bottom right of the screen.
Payment: Anticipated Disbursement
1. Select the Type as Payment > Anticipated Disbursement from the drop-down menu.

2. Search for the anticipated disbursement that you would like to pay by starting to type either the supplier name, matter number, matter name or disbursement description into the Allocate to anticipated disbursement field.
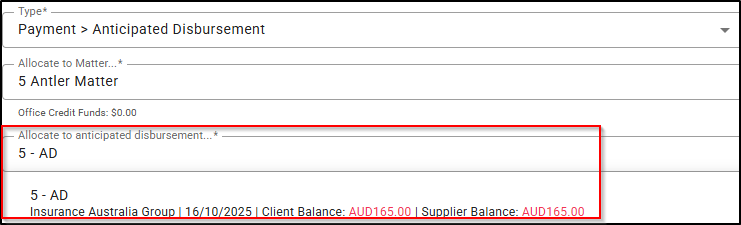
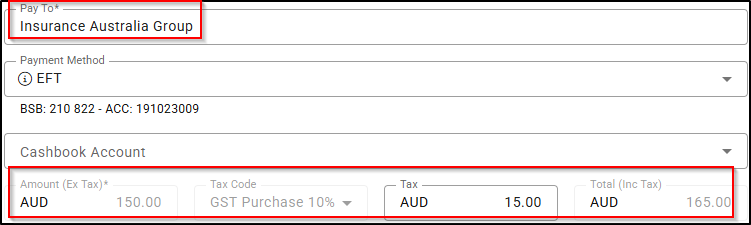
3. The Pay To, Payment Method and Amount (exTax) s fields will automatically populate with the details of the Anticipated Disbursement, based on the above selection.
If the supplier does not exist, perform steps under the Purchase: New Disbursement heading.
4. Start typing a name in the Approver field to select an employee from the directory.
5. Enter a reason for the request in the Reason field

6. Type or select from the calendar symbol to the right of the Required on line, the date on which the Anticipated Disbursement is required.

7. Type any notes in the Memo field provided, if required. This is an optional field and therefore not compulsory to saving the requisition.

8. Click Attach in the bottom right of the screen.
9. Drag and drop the relevant file from a location on your desktop into the box provided, or click on the Drop files here to upload in order to import the file.
10. Select Upload in the bottom right of the screen.
Note: Once a transaction is completed with an attachment present, you can later access the attached file by navigating to the relevant Office or Client/Trust ledger, selecting the transaction and then selecting the Attachments heading.
11. Start typing a name in the Approver field to select an employee from the directory.
12. Select Save in the bottom right of the screen.
Payment: Trust
1. Select the Type as Payment > Trust from the drop-down menu.

2. The Allocate to matter field will automatically populate with the matter you are preparing the requisition in.

3. Start typing a name in the Pay To field to select an entity from the directory. If the supplier does not exist, perform perform steps under the Purchase: New Disbursement heading.
4. Should the selected Supplier have a preferred method of payment chosen on set up, the Payment Method field will automatically populate with this selection and the relevant banking details, for example EFT.

If no payment method has populated for the selected supplier, the Payment Method will need to be selected from the dropdown menu.
5. The (i) to the left of the Payment Method field allows you to view the Payment Method details screen and enter the details relevant to the transaction should you wish to do so at this stage. The Payment Method details (i) are not mandatory to save the requisition.
6. Type in the Amount Tax code, excluding Tax.
7.Select the Tax code.
8. Start typing a name in the Approver field to select an employee from the directory.
9. Enter a reason for the request in the Reason field.

10. Type or select from the calendar symbol to the right of the Required on line, the date on which the payment is required.

11. Type any notes in the Memo field provided, if required. This is an optional field and therefore not compulsory to saving the requisition.
12. Click Attach in the bottom right of the screen.
13. Drag and drop the relevant file from a location on your desktop into the box provided, or click on the Drop files here to upload in order to import the file.
14. Select Upload in the bottom right of the screen.
Note: Once a transaction is completed with an attachment present, you can later access the attached file by navigating to the relevant Office or Client/Trust ledger, selecting the transaction and then selecting the Attachments heading.
15. Start typing a name in the Approver field to select an employee from the directory.
16. Select Save in the bottom right of the screen.
Payment: CMA or Investment (Deposit Accounts in the UK)
The Payment > CMA or Investment Account requisition can be created as follows:
1. Select the Type as Payment > CMA or Investment (Deposit in the UK) from the drop-down menu.

2. The Allocate to CMA / Investment Account (Allocate to Deposit Account in the UK) field will automatically populate with the name of the CMA / Investment Account on the matter. Should there be more than one account on the matter, start by typing the name of the account and select from the list of results.

3. Start typing a name in the Pay To field to select an entity from the directory. If the supplier does not exist, perform steps under the Purchase: New Disbursement heading.
4. Should the selected Supplier have a preferred method of payment chosen on set up, the Payment Method field will automatically populate with this selection and the relevant banking details, for example EFT.

If no payment method has populated for the selected supplier, the Payment Method will need to be selected from the dropdown menu. 
5. The (i) to the left of the Payment Method field allows you to view the Payment Method details screen and enter the details relevant to the transaction should you wish to do so at this stage. The Payment Method details (i) are not mandatory to save the requisition.

6. Type in the Amount Tax code, excluding Tax.
7. Select the Tax code.
8. Start typing a name in the Approver field to select an employee from the directory.
9. Enter a reason for the request in the Reason field.

10. Type or select from the calendar symbol to the right of the Required on line, the date on which the payment is required.

11. Type any notes in the Memo field provided, if required. This is an optional field and therefore not compulsory to saving the requisition.
12. Select Save in the bottom right of the screen.
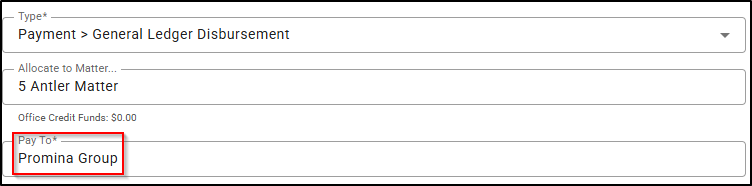
Payment: General Ledger Disbursement
The General Ledger Disbursement requisition can be created as follows:
1. Select the Type as Payment > General Ledger Disbursement from the drop-down menu. 
2. If attempting to create this new requisition from the main menu, please ensure to enter and select the matter within the Allocate to matter field.

However, if creating the requisition directly from the matter, the Allocate to matter field will automatically populate with the existing matter number.

3. Start typing the payee's name in the Pay to field to select an entity from the directory. If the supplier does not exist, perform steps under the Purchase: New Disbursement heading.
4. Enter the General Ledger Account code to which the disbursement should be applied. The account can be found by typing the Account Code or the Account Name in the Pay to Account field.
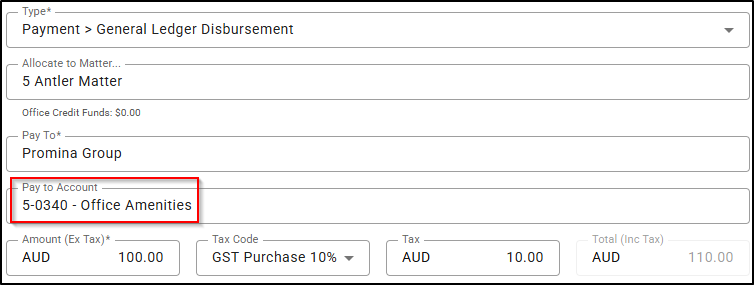
5. Type in the Amount Tax code, excluding Tax.
6.Select the Tax code.
7. Start typing a name in the Approver field to select an employee from the directory.
8. Attach any relevant supporting document/s required for the requisition by clicking the Attach button.

9. Enter a reason for the request in the Reason field.

10. Type or select from the calendar symbol to the right of the Required on line, the date on which the General Ledger Disbursement is required. 
11. Type any notes in the Memo field provided, if required. This is an optional field and therefore not compulsory to saving the requisition.
12. Select Save in the bottom right of the screen.
Was this article helpful?
That’s Great!
Thank you for your feedback
Sorry! We couldn't be helpful
Thank you for your feedback
Feedback sent
We appreciate your effort and will try to fix the article