General Navigation
Modified on Thu, 23 Oct, 2025 at 1:37 AM
TABLE OF CONTENTS
Overview
This guide is designed to help users navigate and use the system effectively.
Please Note: Not all tabs are available to every user, as access is permission-based. If you have full permissions but some menus are not visible, they may be grouped under the ‘More’ tab. This is typically due to screen size, display resolution, or scaling settings. |
All menu options are located at the top of the page

Each tab provides access to quick actions, accounting, time recording, entity management, or settings.

Search
Ask Eve – our AI for reporting, search for any information within the system

Create New
Clicking + gives the option to Create New

Requests & Approvals

This opens a screen where you can view Approvals, My Requests, Ready to Post, Rejected, and History tabs.
You can also create a new request directly from this screen.

Work Items review/post
Displays users’ work items by duration and amount for the day against their target, with the option to create new work items.


Resource Centre
Located at the bottom left of your screen is the Resource Centre. Clicking here gives you full access to guided tours, the knowledge base, and announcements.


Home
Home is the landing page where the default dashboard for your role is displayed. While the dashboard is role-specific, widgets can be added (based on assigned permissions) and dashboards can be edited to suit your needs.
The available menus will vary depending on your role and permissions.

The default layout is automatically applied upon your first login. You can customise the dashboard by selecting Actions.

Or
By selecting My Dashboard, you can view the dashboard of another role (subject to your permissions and role access).
You can also create a new dashboard tailored to your specific requirements.

Work Items
In Work Items, all recorded time entries can be viewed and managed in either a list or calendar format. A range of filters is available to help you display precisely the data you need.

1. List view of work items
2. Calendar view of work items
3. Export to Excel directly to Downloads
4. New Work Item – new time recording entry

By clicking the ellipsis above, users can create a new view and set it as their preferred view.
The dropdown menu next to the view name (e.g., Default) provides additional options. For custom views, users can rename, clone, delete, or disable them. For the Default view, the available options are clone, set as preferred view, or disable.
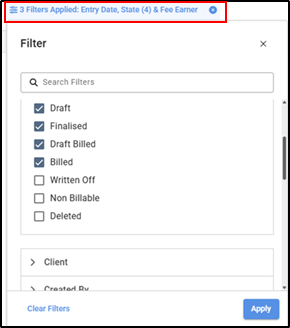
A variety of filters are available, including options by Fee Earner, Client, Matter-related information, and Time Entry details. To view all available filters, click on the existing filter to open the dropdown list, then select your desired options and click Apply to display the results.
Directory
The Directory section displays all firm contacts, including clients, suppliers, and employees.

- All: Lists every contact within the database
- Clients, Suppliers & Employees tabs: Lists the named entity type.
- Favourite: Lists any contact marked as a favourite within the system.
 allows the user to create a New View or alternatively see all views available.
The Add button enables users to create a new contact. Simply open the dropdown menu and select the appropriate contact type you wish to add.

Viewing information from the results screen below
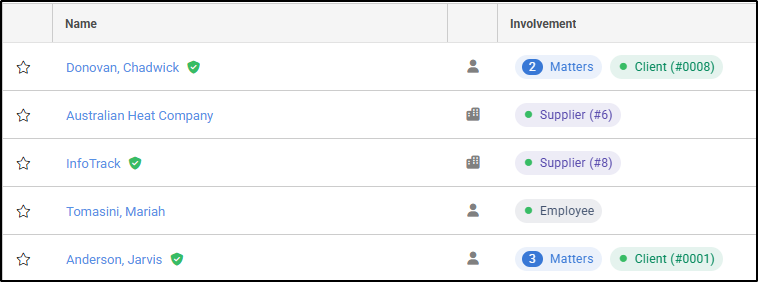
Name: Hover over the name to view additional information about the contact, depending on the contact type:
- Client: Displays the client and WIP balance for all matters, contact details, and the client reference.
- Supplier: Displays contact details, and the supplier reference.
- Employees: Displays contact details.
- Verification Badge: A green check mark will appear to the right of the name if the entity has been verified.
Unnamed Column: Shows whether the contact is an individual, an organisation or a joint entity.
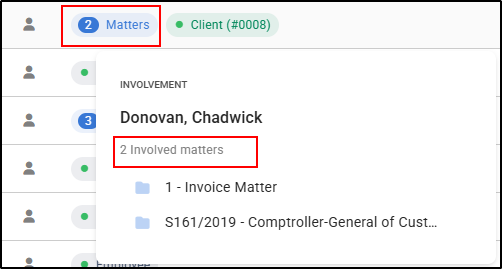
Involvement: Displays the contact’s relationship with the firm. For clients, it also shows the number of matters they are involved in.
The matters are hyperlinked — clicking on the matters bubble opens a list of related matters, which can then be selected to view in detail.
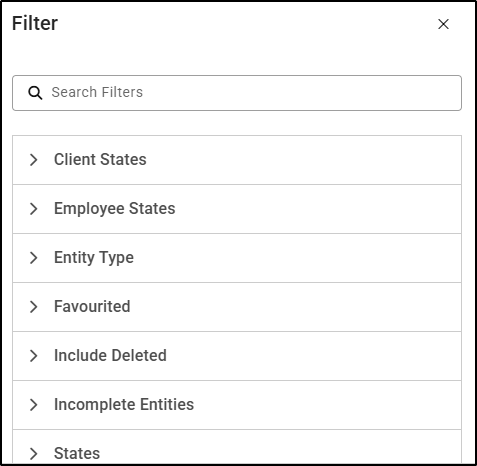
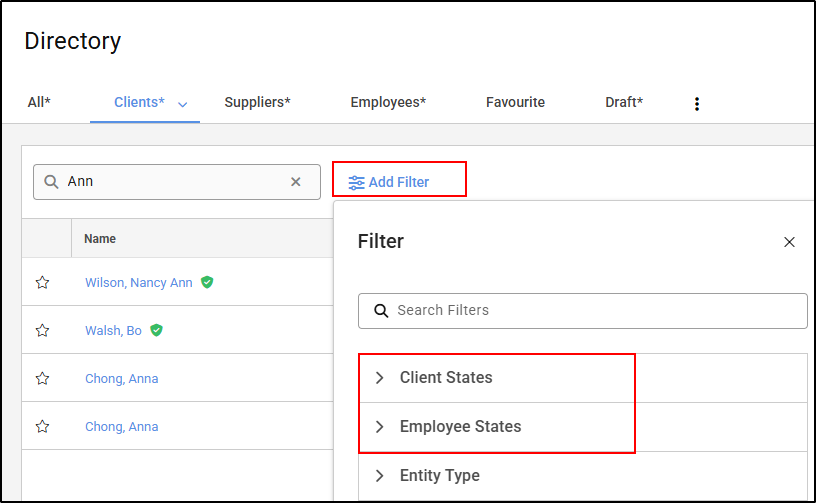
Each tab includes an option to filter the results displayed on the screen:

Clicking Add Filter allows you to include the following fields:
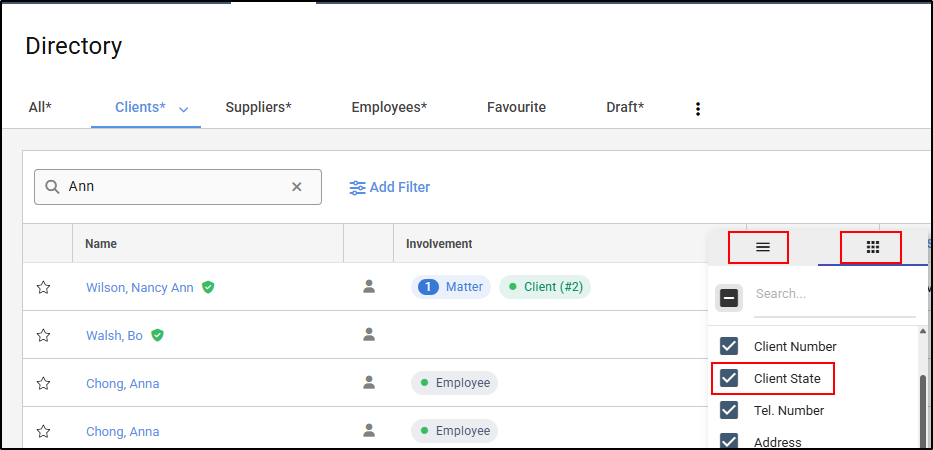
Users can rearrange the columns by clicking the horizontal lines icon.

Or
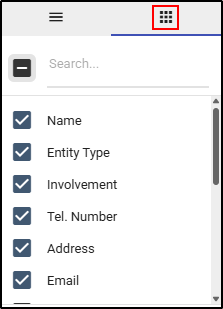
Users can click the icon below to choose which columns they want to display.
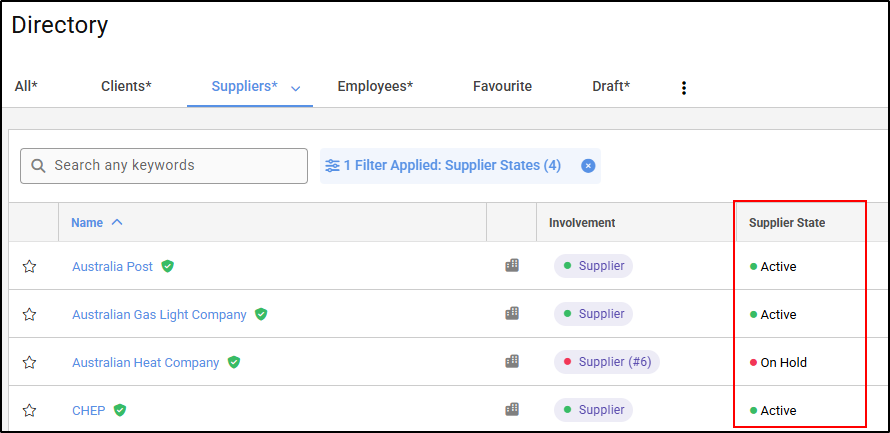
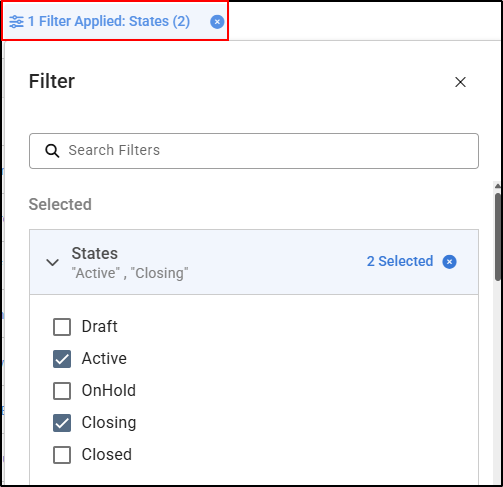
States
There are five states across the system: Draft, Active, On Hold, Closing and Closed. You can view the state of each entity within the Directory, such as Employees, Clients, and Suppliers.
If the state column is not visible, you can add it by clicking on the three lines, then the dots, and tick the column you want to display.
You can also filter by state by selecting State from the available filters.
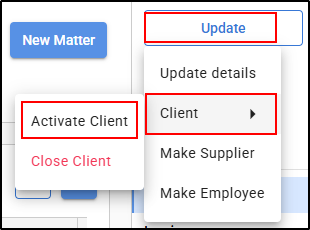
Placing an Entity on Hold
You can place a Supplier, Client, or Matter on hold. Doing so will prevent new matters from being opened and block any further transactions against them.
To do this, open the Client, Matter, or Supplier card and, using the update menu, select the hold option.
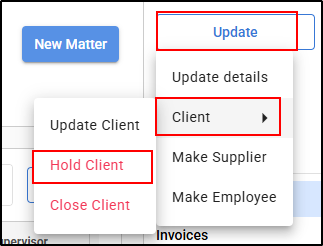
You can reactivate the entity at any time by returning to the same Update menu and selecting Activate Client.
Matters
From the Matters menu, users can view all matters in the database or select from their favourite matters.
Users can also create a new matter directly from the menu using the button below:

The Matters tab is divided into three distinct sections, as shown below.

- Active: Shows all matters opened within the database - additional "states" can be selected within the filters
The search option can be used to search for relevant matter information

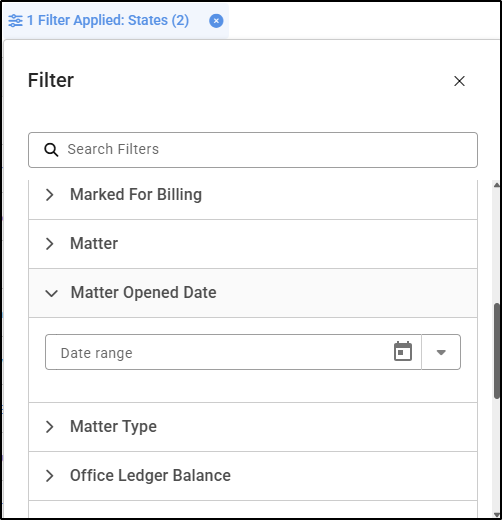
Filters can be applied to narrow down search results - for example, by Billing Basis, Client Balance (using a specific value or a range), or Matter Opened Date.
The number of matters seen can be increased – default is set at 25 matters per page. This can be increased to a 100 if required by clicking on the below items per page found in the bottom right-hand corner. Alternatively, the greater than and less than icons allow you to navigate forward or backward through the pages of matters.

To the right-hand side of the screen, columns can be added or removed and rows can be grouped in a preferred method by clicking on the Columns icon

Any amendments can be Saved as a new and preferred view by clicking on the icon below
Favourited Matters
By clicking on a favourited matter from the Matters menu, the matter record opens on the screen.

Invoices
All Invoices enables the user to see all invoices in their relevant status menu:

Default Settings:
Active: Displays all draft, pending, and approved invoices.
Outstanding Invoices: Shows invoices that have been issued but not yet paid.
Closed Invoices: Displays invoices that have been paid (closed).
Credit Notes: Lists all credit notes issued for matters.
Each of the four views displays information relevant to the selected category. For example, in Outstanding Invoices, you can see a detailed breakdown of each invoice along with the outstanding amount.
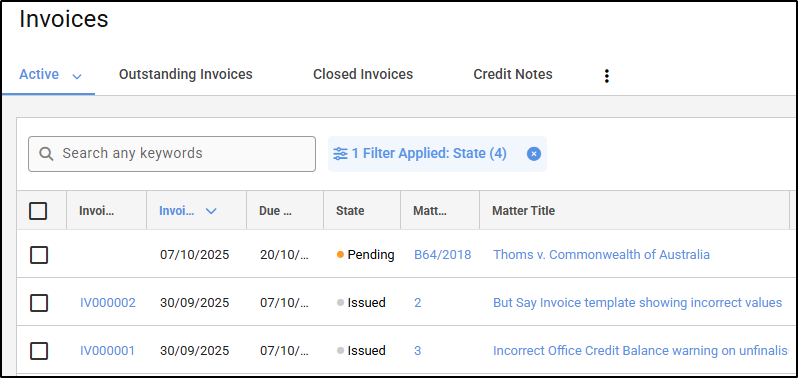
All invoice numbers, matter numbers, matter names, and client names are hyperlinked to their corresponding areas within the database.
In the last column on the right, an ellipsis provides access to various actions. The available actions depend on the user’s permissions, and selecting any option will navigate the user to the relevant screen.

Invoice Overview

In the Invoice Overview menu, matters are organised by their unbilled status, invoices awaiting approval or finalisation, outstanding invoices, or overdue invoices. Each header displays the invoice value and the number of matters/invoices it contains.

- Unbilled Matters: Shows all matters with unbilled transactions, categorized by transaction type: unbilled fees, disbursements, and cost recoveries, along with the total potential invoice value. Each matter can be billed directly from this screen.

To the right of each Bill icon, an ellipsis provides options to View Draft Invoice or View Matter Summary.


- Invoices Awaiting Approval or Finalisation: Displays all drafted invoices with a status of Pending (requiring approval) or Approved (awaiting finalisation). Each invoice includes a detailed breakdown of the totals for each section that makes up the invoice.

If an invoice is Pending, it can be viewed from the right. If it is Approved, it can be finalised from the right.
Next to the View Invoice or Finalise Invoice buttons, an ellipsis provides additional options, which vary depending on the invoice’s status.

- Outstanding Invoices: Displays all finalised/issued invoices that are still within the firm’s payment terms. Due dates are defined in days.
- An outstanding invoice can be sent directly by clicking the Email button, or you can choose to email, print, or view the invoice via the ellipsis.

- Overdue Invoices: Displays all invoices that remain unpaid past their due date.

An Email button is available on the screen for convenience, sending the invoice directly to the designated billing contact. Alternatively, using the ellipsis, the invoice can be emailed, printed, or viewed.
Filters can be applied in both All Invoices and Invoice Overview to refine the data displayed.
Purchases
The Purchases menu displays all information related to supplier invoices, including both Purchase Orders and received Supplier Invoices. By default, it shows only Open/Unpaid Invoices and Purchase Orders. From the Purchases menu, users can also add Purchase Orders, Purchase Invoices, and Supplier Credit Notes.


Add Purchase Order

To send a Purchase Order to a supplier, click Add Purchase Order and enter all the required details:
Add Purchase

A supplier invoice can be added similarly to a Purchase Order by clicking Add Purchase. The key differences are the inclusion of additional date fields and tax options.
Using the Actions menu, users can also create a template for frequently posted supplier invoices to save time and reduce repetition.

Create Template for recurring supplier invoices
Apply Template applies a template to the purchase screen but allows amendments to the details
Add Supplier Credit Note

When a supplier credit note is received, it can be quickly recorded directly from the Purchases menu without accessing the supplier record.
Once issued, the credit note must be allocated to an open invoice to adjust the balance due for payment.
Ellipsis Options: Additional actions related to the credit note can be accessed via the ellipsis.

The options available under the ellipsis vary depending on what has previously been posted to the supplier card. The Pay with Credit option is only available if a credit has been recorded on the supplier card.

Banking

The Banking menu displays the current Client/Trust and Office cashbook balances, along with the last reconciliation date and the number of unmatched statement transactions in the cashbook.


Each cashbook can be clicked to open the Cashbook Entries screen, where users can post transactions, prepare payments, import bank statements, complete reconciliations, and view the history of any bank deposits or payments.
Account details can also be edited directly from this screen.
Favourited cashbooks can be accessed from either the Banking menu or the Banking screen.


General Ledger
From the tabs at the top, select General Ledger. This displays your Client/Trust, Office, and any other Journals that have been set up. Each journal contains its own Chart of Accounts.

Within the screen, the Default Journals and their Locked Dates are visible. If a new journal is needed to create a different Chart of Accounts, it can be added directly from this screen by clicking on the relevant option.

Each journal is clickable. Selecting a journal opens a transaction list specific to that journal, with options to:
Lock the journal
Access the Accounts that make up the journal
View Account Roles (control accounts) for the journal
Add Budget Sets
View, adjust, and submit a VAT Return (UK only)
Additionally, accounts can be created and posted to directly from this screen.

Reports
The Reports area is segmented into 4 areas:

Financial: Contains reports detailing the financial security of the firm.
Management: Includes reports on debtors, creditors, WIP, and Fee Earner performance.
Other: Provides client- and/or matter-related statements of account.
Compliance: Displays reports typically requested by accountants or auditors during the preparation of annual reports and accounts.
Favourites Tab:
Reports can be marked as favourites to streamline month-end processes or to gather commonly run reports in one place. Clicking the star next to a report adds it to the Favourites tab within the screen.

Customised Tab:
All reports are fully customisable. If a report contains most of the elements you need but is missing additional details, you can open the report and use the available features to create a tailored, unique report to suit your requirements.

Once the report is complete, it can be saved under a unique name and, if needed, shared with others.
Note: On saving the customised report it will be saved on the customised tab.
Settings
The Settings menu is f into three areas:

1. Firm Settings
The menu is divided into seven key areas, allowing requirements and behaviours to be customised for each firm.

Accounting: Configure accounting settings to comply with regional legal and tax requirements.
Billing: Set up rates and defaults for billing processes.
Employees & Teams: Create job titles and teams, set targets, and modify role permissions.
General: Manage overall firm settings.
Matters: Configure matter-related settings.
Notifications: Set up email and notification preferences.
Reports: Schedule named statements automatically, define their behaviour, and customise templates.
2. Message Quarantine
The Message Quarantine works in conjunction with the settings configured under:
Firm Settings > Notifications > Message Quarantine Configurations
Within the Message Quarantine menu, scheduled emails can be reviewed before they are sent to recipients.
3. Manage Scheduled Tasks
The screen lists all scheduled statements, showing their triggers, last run date, and next scheduled run. Statements can be edited, disabled, or run immediately from this screen. A history of each task is also included.
Was this article helpful?
That’s Great!
Thank you for your feedback
Sorry! We couldn't be helpful
Thank you for your feedback
Feedback sent
We appreciate your effort and will try to fix the article